Customizing the Firmware
The Glow's firmware is built on ESPHome, a platform designed for customization through simple YAML configurations. Whether you need to tweak the device's functionality or adapt it for different use cases, the process is straightforward.
This guide will walk you through how to adopt the device and customize its firmware using the ESPHome Builder.
Adopting the Device
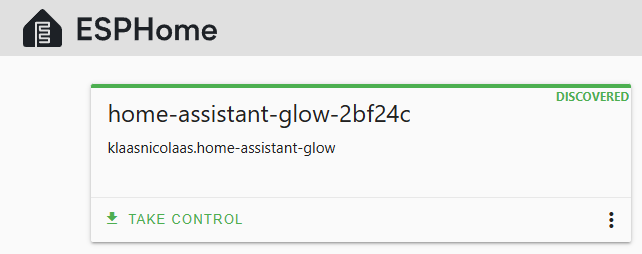
Before making any changes to the firmware, you first need to adopt the device into the ESPHome. Once your ESPHome Builder is up and running, and the Glow is connected to your local network, you should see an option to Take Control of the device.
Taking control of your Glow device will:
- Replace the default firmware with a custom ESPHome configuration
- Add an encryption key for secure API communication
- Configure the device to use Wi-Fi credentials from your ESPHome secrets
- Stop automatic firmware updates from glow-energy.io
After adoption, you will be responsible for managing firmware updates yourself through ESPHome Builder. You can always revert to the default firmware, but this will require re-installing the device.
Component Structure
The firmware is designed to be flexible for different ESP boards by breaking it into separate "components". Each main function of the device is kept in its own YAML file, making it easier to manage. The base configuration includes a few key components that handle the important functions of the device.
| Component | Description |
|---|---|
| basis.yaml | Handles the basic, essential functionality of the device. |
| pulse_meter.yaml | Manages pulse metering, useful for tracking energy usage. |
| status_led.yaml | Controls the status LED, allowing customization of its behavior or color based on the device's state. |
| updates.yaml | Provides Over-the-Air (OTA) update capabilities for easy firmware updates. |
Making Your First Customization
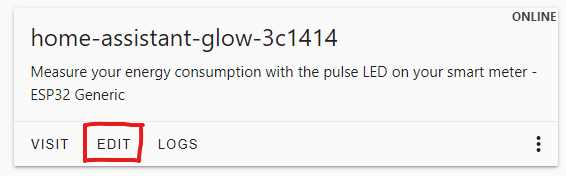
Once your device is adopted, you can start customizing its behavior by editing the configuration files. In the ESPHome Builder, click on EDIT next to the device to open the YAML editor, where you can modify the configuration directly.
The YAML configuration may seem short and incomplete because it relies on remote packages, which are loaded during the firmware build process. If you want to customize or modify anything, it's important to first find the used ESPHome component ID.
Finding Component IDs
To customize a specific component, you need to know its ID. Here are the commonly used component IDs in Home Assistant Glow:
- sensor_energy_pulse_meter - The main energy pulse meter sensor
- status_led - The RGB status LED
- ota_esphome - OTA update component
You can find all component IDs by viewing the component YAML files on GitHub.
Example Customization
When you open the YAML editor, you'll see the default configuration for your Glow device. You can adjust this configuration or add new functionality by extending the existing components. For example, to change the behavior of the pulse_meter, you can use the !extend feature to easily make the necessary changes.
Here's an example of increasing the accuracy of the total energy sensor to 5 decimal places:
sensor:
  - id: !extend sensor_total_energy
    accuracy_decimals: 5
Some settings, like the internal filter, are no longer configurable via YAML and must be adjusted through the Home Assistant UI or the built-in web interface. See the Internal Filter page for more information.
Reverting to Default Firmware
If you want to return to the default firmware and automatic updates from glow-energy.io, you can do so by re-installing the device:
- Navigate to glow-energy.io and follow the USB installation method
- This will overwrite your custom ESPHome configuration with the default firmware
- You will lose any custom modifications you made
- After re-installation, you will need to re-add the device to Home Assistant
Before reverting, consider backing up your custom YAML configuration in case you want to use it again later.