Get started
This guide will walk you through the steps needed to set up your new Home Assistant Glow. You'll go through connecting the hardware, installing the necessary software, and configuring the settings to get everything up and running smoothly.
Step 1 - Hardware
To get started, you need the right hardware first, fill your 🛒 or see if you already have the items in house. Choose between an ESP32 (recommended) or ESP8266.
| Nr. | Item | Shops | ||
|---|---|---|---|---|
| 1. | ESP32 (recommended) | AliExpress | AliExpress | Banggood |
| 1. | ESP8266 | AliExpress | AliExpress | Banggood |
| 2. | Dupont Jumpers (female to female) | AliExpress | AliExpress | Banggood |
| 3. | LM393 Photodiode | AliExpress | AliExpress | Banggood |
| 4. | LED RGB 5mm 4 pin - kathode | AliExpress | AliExpress | Banggood |
If you would like to prototype, I can also recommend the following items:
| Nr. | Item | Shop |
|---|---|---|
| 1. | ESP32 Development Expansion Board (optional) | AliExpress |
Keep in mind that besides the photodiode board there are also boards in circulation with an LDR. The expansion board is optional, but makes it easier to connect and prototype with the components.
How everything should be connected can be found on the wiring diagram. Once this is done, you can proceed to step 2.
Step 2 - Install firmware
Use the method below to provide your ESP with the correct firmware.
- USB
Make sure this page is opened in a Chromium-based browser on a desktop. The software installation does not work with a tablet or phone.
- Click the blue connect button below to display a list of available USB devices.
- To connect your ESP to your computer, follow these steps:
- In the pop-up window, view the list of available USB devices.
- Connect your ESP to your computer using a USB cable.
- In the pop-up window, there should now appear a new entry. Select this USB serial port and select Connect.
- Select Install Home Assistant Glow, then Install.
- If the installation does not go well, you may need to first hold down the
bootbutton and then click Install.
- If the installation does not go well, you may need to first hold down the
- Once the installation is completed, click Next.
- Add the Home Assistant Glow to your Wi-Fi network:
- When prompted, select your network from the list and enter the credentials to your 2.4 GHz Wi-Fi network.
- Click Connect.
- The Home Assistant Glow is now connected to your network.
- Add the Home Assistant Glow to your Wi-Fi network:
- Congratulations 🎉 You have successfully installed the firmware on your Home Assistant Glow.
Step 3 - Connect to Home Assistant
There are two ways to connect the Glow to Home Assistant. You can do this during the firmware installation or later via auto discovery.
Option 1 - During firmware installation
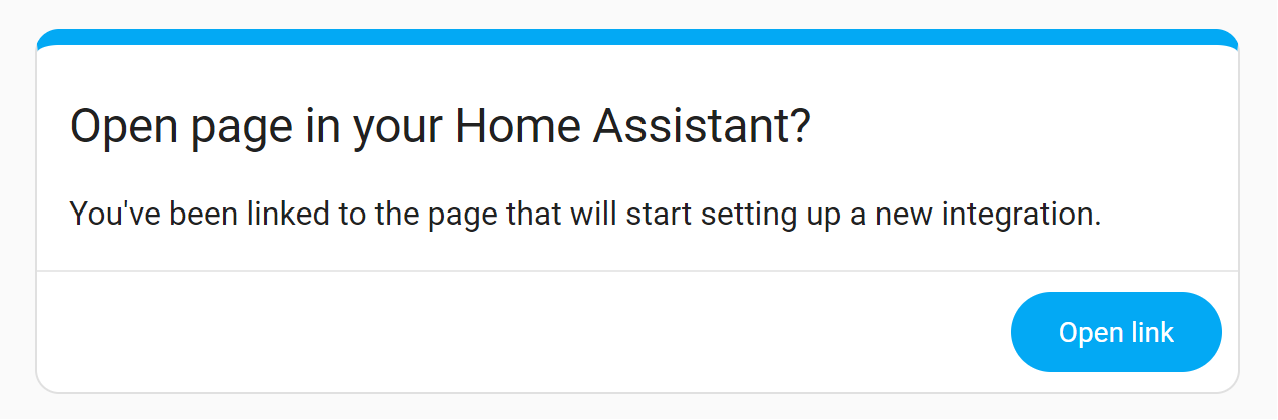
- Immediately after setting up your Wi-Fi network (from step 2), you will see a screen with the option Add to Home Assistant.
- This opens the My link to Home Assistant (see image below).
- If you have not used My Home Assistant before, you will need to configure it. If your Home Assistant URL is not accessible on
http://homeassistant.local:8123, replace it with the URL to your Home Assistant instance.
- If you have not used My Home Assistant before, you will need to configure it. If your Home Assistant URL is not accessible on
- This opens the My link to Home Assistant (see image below).
- Click on Open the link.
- It opens your Home Assistant instance and asks you to set up, click OK.
- Congratulations 🎉 You have successfully added the Home Assistant Glow to your Home Assistant instance.
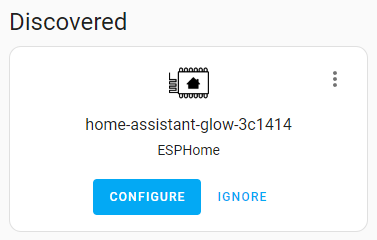
Option 2 - Auto discovery
When the Home Assistant Glow is added to a network to which your Home Assistant instance is also connected, your device will automatically be recognized in Home Assistant.
- Under Settings > Devices & Services, your Home Assistant Glow should be discovered (see image below).
- Click on Configure, at the discovered device.
- It asks if you want to add the device and click Submit.
- Congratulations 🎉 You have successfully added the Home Assistant Glow to your Home Assistant instance.
Step 4 - Configure the Pulse Rate
To ensure that the Home Assistant Glow accurately measures energy consumption, you must set the correct pulse rate. The pulse rate refers to the number of pulses the energy meter sends per kilowatt-hour (kWh). Energy meters with a pulse LED will have an imp/kWh value indicated, such as 1000, 2000, etc.
By default, the Home Assistant Glow is configured to use a pulse rate of 1000.
There are two ways to adjust the pulse rate:
Option 1 - Via the web interface
Access the web interface by navigating to the IP address of your Home Assistant Glow. Once there, you'll find a table with a row labeled Pulse rate - imp/kWh, where you can easily adjust the value in the column on the right.

Option 2 - In Home Assistant
- Go to the device overview page of the Home Assistant Glow, via Settings > Devices & Services > ESPHome.
- Adjust the value for the entity Pulse rate - imp/kWh.
For problems with the measurements, see the FAQ page.
Step 5 - Print the case
The final step is to wrap everything up in a casing that you can print. The files for this can be found on the case resources page. If you do not have a 3D printer, there are platforms where you could place a print job or mount the Home Assistant Glow in a creative way 🙃
Step 6 - Sit back and relax
Congratulations 🎉 You have gone successfully through everything to get started with the Home Assistant Glow 🌟 If you have any questions, please check the FAQ page first and if you can't find the answer there, you can always ask your question on the Github.
Disclamer
Affiliate links are used on this website to support the Home Assistant Glow 🌟 project. Some Ad-blockers might block these links, and thus they seem to appear broken. You will have to temporarily disable ad-blocker to open these links.